How to Pitch a Traditional Porch Awning
New to caravanning and looking for advice? Pitch your traditional porch awning like a pro!
Mike shares his tips and tricks on how to pitch your porch awning ahead of your holiday. Read on to discover our complete step-by-step guide below, ready for that extra bit of advice when at the campsite.
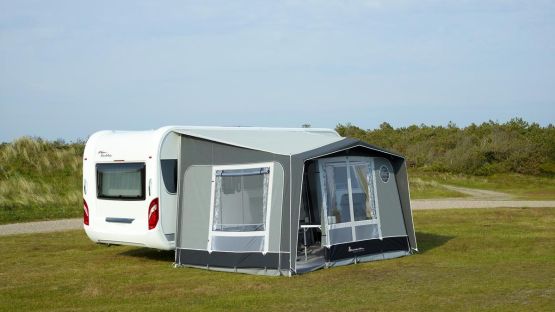
To demonstrate this, we are using the Quest Kensington Awning. This awning is a standard poled porch awning, measuring 250cm in depth and 380cm in width. We also recommend using V-shaped, metal pegs, or rock pegs if you are on a hard-standing pitch, which can be purchased in-store or online here.
Step One
Open your pack and separate the awning fabric from the frame. Often, the awning will come in two separate bags (one for each). Mike recommends removing the panels from the awning canvas, which will reduce the overall weight that you feed into the rail, thus making the awning more manageable.
Remove the frame poles from the bag and lay each pole in the format required for the awning. This will speed up the pitching time, as you know where each part goes and also be in easy reach when you need it. It's important to check you have all the correct poles before heading off on your trip.
Step Two
Unfold your awning and locate the kador or beading, which is typically found on the edge. Attach the awning bracket to the kador and slide to meet the first pole gap.
Mike recommends gathering the awning material up under the caravan rail and sliding it directly through the rail. This step might require a separate pair of hands; keep checking that it's feeding correctly and not catching or slipping out of place. An optional Awning pulley can be purchased to aid in feeding the awning onto the rail.
Once it's on the rail, pull the porch awning fabric into position. You may need to adjust the position to avoid missing a window or a locker. If you had already removed the door panels, you should be able to see where the door of the caravan sits. Mike recommends you have enough space on either side of your door to open and close with ease.
Step Three
Next, secure the back two corners of your awning tightly against the caravan, then locate your cross piece. This will ensure the awning remains stationary, as it will then be in position. Place the crosspiece in the fabric gap, ensuring the spike is in the eyelet. Secure with the rain cowl, which makes it an accessible height and holds the spike in place.
Step Four
With your central roof pole, insert the hooked end into the awning bracket and expand the roof pole to feed directly into the cross piece. Spread this pole to create tension in the fabric and stop the joint from falling out.
Step Five
While still holding the crosspiece, insert your leg pole and extend it enough so that you can stand inside. Mike recommends adding some guy robes for extra support on a windy day.
Step Six
Next, you will create the sides of your porch awning. Using the side poles and tension brackets, insert them into the crosspiece and repeat on the other side.
Step Seven
Using the second crosspiece, feed the component through the awning fabric and under the clamp of the side pole, which is already attached to your central crosspiece. Insert one pole into the other and spread accordingly. You want a bit of tension, but not so much that it stretches the fabric.
Insert the leg pole and extend it to the floor, then secure it. Then, with your sidearm pole attached to the awning bracket, extend and secure it in place. Add the rain cowl. At this stage, the porch awning may be angling down, which you will alter at a later step.
Repeat the above on the other side.
Step Eight
Flip the extra brow canopy material over the main body of the awning so you can see the canopy poles. Next, feed the brow poles into the frame and secure them by passing the spike through the eyelet. Mike recommends untensioning the pole so you have more to work with.
Step Nine
Once you have the main frame attached together, pull out each pole to adjust the tension, and repeat this process across all points on the front of the awning to ensure a sharp appearance.
Step Ten
The next step is to add the side panels. Mike recommends attaching both zips on each side of the panel, as this will make sure the awning is straight. Do the zips up by pulling the fabric up towards you and zipping accordingly until secure.
Repeat the process for the front panel until all panels are zipped in.
Step Eleven
Next, attach the rear upright pole to the frame via a bracket or clamp it onto the main frame. Lock the frame to the canvas by using the velcro or popper tabs. Position the pole to achieve a snug fit
Step Twelve
Tuck your mud skirts under the awning, then continue to go around the base of the awning, pegging the panels so that there is tension away from each side of the panel. Ideally, all poles on the awning need to follow seams on the canvas, and pegs are inserted at a 45-degree angle. You may need to adjust it so the fabric is plush against the pole.
Step Thirteen
Next, adjust your poles inside the awning. Mike recommends starting with the middle pole, you will feel the tension and where you should increase the height too. Adjust the sides and roof to how you see fit. You may need to tweak the pegging points and adjust for extra tension.
Step Fourteen
Finally, peg your final points around the porch awning. Mike recommends purchasing storm straps if your awning does not have them as standard, to secure your awning and reduce the wear and tear. Webbing straps are also handy to anchor the awning and peg at a 45 degree angle.
A final note from us
So that completes our step-by-step guide on how to pitch a traditional porch awning. We hope you have found our video and guide helpful. For all the latest tips and tricks, make sure you're following our social channels linked below.
![]()
![]()
![]()
![]()
SHOP PORCH AWNINGS
We’re always on hand to offer help and advice, give our superstore a call on 01452 742233 or send us an email on camping@attwoolls.magento24.sozowebdesign.com and we will do our best to help you.